How to Add RAM to Your Computer
This is a Sponsored post written by me on behalf of Crucial.com for SocialSpark. All opinions are 100% mine.
 You should know how to add RAM to a computer.
As a Computer Scientist (Master’s degree and all), I can tell you that in the vast majority of cases, dollar for dollar there is no single thing you can do to improve the performance of your computer than adding RAM. You’ll often notice that in most modern machines, the processor(s) themselves mostly just sit there idling along, yet despite this, your computer still freezes on occasion or slows down suddenly when you open applications or the like. A good percentage of the time when your computer does this, it’s often the case that it’s waiting for something to swap out or otherwise load from the hard drive. This creates a bottleneck on your computer. You can minimize the effect of the bottleneck by maximizing the amount of RAM in your computer, which will improve computer performance.
I personally still have two old desktop computers (one 11 years old, one 6 years old) that are still going strong thanks to the fact that I’ve maxed out their RAM (one functions as a home media file server, the other just used for normal things word processor/email/internet/etc.). The processors on these machines are nothing special, particularly by today’s standards, nor are the hard drives or graphics cards (I even just embedded graphics on the one). Never-the-less, they still perform quite well.
To understand why adding RAM to your computer allows it to speed up so much, it’s necessary to understand, at least at a high level, how an operating system uses it. When you open an application like your web browser, the operating system has to pull the necessary files from the hard drive into RAM so that instructions can then be loaded into the processors’ cache and registers so it can do everything it needs to do to bring up the browser and what it needs to do while you’re use it.
Now, if the necessary data is already in RAM, the computer won’t need to first load it from the hard drive. This is important as, depending on your computer and type of hard drive, accessing data from a hard drive can take as much as 100,000 times longer than accessing it from RAM. When your RAM starts to get filled up, the operating system then usually ends up having to create something called “virtual memory” that resides on your hard drive. When the operating system needs to use some data in this virtual memory, then it has to be loaded back into RAM and something else must be swapped back out onto the hard drive to make room. So, effectively, rather than things running at RAM speeds, you’ll often end up with your computer performing with hard drive speeds, about 100,000 times slower for random reads.
Thankfully, RAM is quite inexpensive, particularly relative to the cost of a new computer and you can often squeeze an extra year or two or more of life out of your computer by adding RAM. Particularly for those of you who only use your computer for things like email, browsing the internet, and the like, and not hard core gaming or things of this nature, you might even find adding RAM to an old computer can make it run plenty fast for the foreseeable future. No new computer needed. My aforementioned computer that’s 6 years old actually even just has a single core, 2.2 GHz processor, but still runs Windows 7 and performs well for things like email/web browsing/Netflix/etc. When I upgraded it to Windows 7 from XP, it started running a bit slow, but I just added RAM (from 1GB to 4GB) and it went back to being quite snappy.
RAM is not only relatively cheap, but also extremely easy to install, even for non-techies. If you can put toast in a toaster or replace a battery in your alarm clock, you’ve got the necessary technical skills to add RAM to your computer. As far as what RAM is the right RAM for your computer, this takes a little more technical expertise to determine on your own, but for you non-techies or just those too lazy to look it up for yourself, you can use tools like the “System Scanner” offered at Crucial.com, which will automagically scan your computer and tell you not only what type you need, but also what the max amount your computer can hold.
Every computer is going to be slightly different, in terms of the layout of where the RAM is, how to open the case, and the like, but if you follow the basic steps below, you should have little trouble adding RAM to your desktop or laptop. As an example to demonstrate, I’ll be adding a bit more RAM to the Dell desktop computer I use as a test web server, among other things.
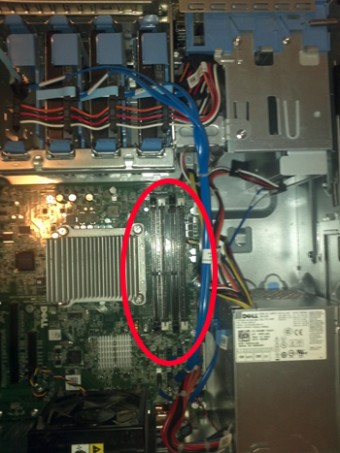
Locate the RAM Sockets
Step 1: Unplug your computer. In the case of laptops, you should also remove the battery. Once this is done, hold down the power button of your computer for about 30 seconds to discharge the capacitors in your machine. This latter power discharge step isn’t strictly necessary, but better safe than sorry.
Step 2: Take off the removable panel on your desktop. In the case of a laptop, one of the panels on the bottom half will need removed. On laptops, it is usually marked with a small symbol that looks something like RAM, but if not, just look it up in your manual as to which one, or given there is likely only a couple such panels (one for RAM and one for a hard drive), just remove until you get the right one. In both cases, whether laptop or desktop, you can usually accomplish removing the necessary panel simply by removing a couple screws. With some case designs, such as the laptop I’m using right now, you don’t even need to remove screws, the panel just pops out. The Dell desktop I’m adding RAM to right now just has a little lever that needs pulled and the side panel falls right off.
Step 3: You want to try to be static free before touching the RAM or the inside of your computer, so no rubbing your feet on the carpet before doing this and fleece jackets over your shirt as you do this is a no-no. If you don’t have a grounding strap handy, just touch the metal part of the main frame of your computer and that should do the trick well enough for these purposes. While putting in the RAM, think non-static thoughts. 😉
Step 4: Locate the slot you’re going to put the RAM in. If you’ve never seen the inside of a computer before, this may seem like it would be hard, but at this point, you should be seeing that it is not. Just locate the RAM that’s already in your computer and looks just like the RAM you bought. If you need to remove existing RAM to free up a slot, you can do so by pushing down on the plastic clips at the ends of the RAM. When you push them down, the RAM should pop up a little. In the case of a laptop, when you push the clips away from the RAM, the RAM will probably spring out a little bit, angling towards you.
Step 5: Unpackage the RAM you purchased, making sure to only hold the RAM by the edges while trying to avoid touching the main chips or circuitry.
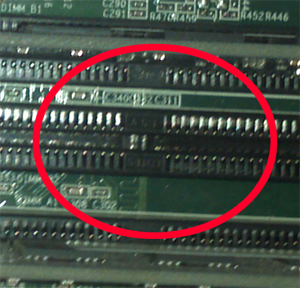
Line up the gap in the RAM pins with the niche in the socket
Step 6: You’ll notice a little gap in the pins on your RAM. This will tell you which way to put it in the slot in your computer. You’ll also see a corresponding piece of the socket which will match that slot (see picture). Now line up the RAM with the socket, making sure the gap is directly over the corresponding niche in the socket and push down evenly on the top of the RAM until it is fully seated in the socket. In some computers, it takes a fair amount of pressure to do this, so don’t be afraid to give it a firm push, just make sure you are pushing straight down, so you don’t accidentally snap it sidewise. You’ll know when it’s in far enough as the two clips on the edges will snap fully in place automatically. If you didn’t seat it fully, it’s likely when your computer starts up that you’ll get an error message and it will beep at you a bit. (I’ve done this a few times myself, installing RAM too cavalierly).
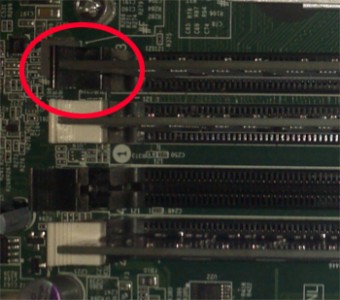
Make sure the edge clips have fully snapped in place.
Step 7: Put the panel back on, plug in your computer, and start it back up. If everything is registering properly, it should start up smoothly. You won’t notice the speedup here on the startup, as the computer has to load everything from the hard drive at this point, but particularly when you have several applications open, you should notice a lot less slow-downs and freezes.
Pro-tip: When you have the case open, you might notice quite a bit of dust has accumulated in your computer. Use a can of compressed air to get rid of this. The dust makes your computer heat up a lot more than it would without, so removing it can extend the life of your machine. Particularly with laptops you may have noticed that when you first get them, they don’t heat up much when you use them, but then after a year or two they get super hot when on your lap. This increase in heat retention is due primarily to dust accumulation in the case. Spray the can of compressed air in every nook and cranny of the laptop you can get to in order to remove as much as possible. This will extend the life of the laptop and reduce your power consumption as the fan won’t need to kick on as much or as hard.


| Share the Knowledge! |
|
 |
Just a note: when you write sponsored articles, the author is ‘Sponsored’, so nobody actually knows that you’re Daven, heh. Might want to add that as a tag?
@Mushyrulez: Fixed!